Thursday, March 9, 2017

How to Cut and Join Videos with Avidemux

Avidemux is a free open-source video editing software, it’s designed for video cutting, video joining, video filtering and encoding. Free as it is, it supports many video formats, including MP4, AVI, MKV, MOV, ASF, FLV etc. Besides, all the features are intuitive and brief, so it’s very easy to use, even if you are a newbie. Another good news about Avidemux is that it has both Windows version and Mac version, so you can feel free to use it not worrying your computer operation system.

Although Avidemux is an all-in-one video tool, it’s often used as a video cutter and video joiner. So in this post, I will expound to you how to use Avidemux to cut and join videos, just read it and you will know the answer.

How to Use Avidemux to Cut Videos
1. Add a Video File
Just click File > Open, and you can be free to add the video you want to cut.
2. Set Start Marker and end Marker
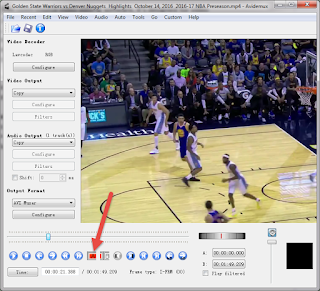
Pull the slider on the time line, and click the A in the box if it’s your starting point. And pull the slider again until you find your ending point, then click B.


3. Cut the Part You Choose
When you choose the portion you want to cut, just click Edit > Cut, and the software will cut the parts very quickly. At that time, you should preview the video. If you are very satisfying with the video, then you should go to the next step, if you are not, just do the cutting process again.


4. Save the Video
After you get rid of the unwanted parts of the video, it’s your turn to set your output format. When all set is done, now hit on File > Save, and the video will be saved as a new video at a fast speed.

How to Use Avidemux to Join Videos
1. Add the First Video File
Click File > Open, and you can be free to add the video you want to cut. When you are importing a video, you have to know that Avidemux can’t change the arrangement of the joining video, so you have to add videos in chronological order.
2. Add the Rest of Videos in Order
When you want to add other videos, click File > Append. You must keep in mind that the rest of the videos must have the exactly same size as the first one, otherwise you can’t upload it successfully.
3. Set the Right Format
After you importing all the videos you want to join in order, now you have to select your ideal format for output. It has many choices for you, MKV muxer, AVI muxer, FLV muxer etc. Just picks up the one suits for you the best.
4. Save the Video
After all is done, just click File > Save, and the videos will be joined to a whole one.

Now you see, it’s very easy to use Avidemux to join and cut videos. Just give it a try and start the journey of homemade videos.


Thursday, March 2, 2017

Gihosoft Free Video Joiner - How to Join Videos in a Simple Way

We always want to take videos which impress us the most so that we can keep the precious moment forever! As the development of technology, we can take videos easily with our smartphones conveniently nowadays. Usually there are two problems with these videos. The first one is that these videos maybe have some unwanted parts, like blank or redundant content, for this problem, you can use Gihosoft Free Video Cutter to cut it. The other one is that you may feel inconvenient to watch several videos one by one, definitely a waste of time. It’s a better a idea to join these videos together to a whole video, for this purpose, Gihosoft Free Video Joiner can help you. Here I will give you some detailed descriptions about this video joiner software.

Why choose Gihosoft Free Video Joiner to join videos?
1. It’s completely free and easy-to-use, anyone can feel free to use any feature of this product without costing a penny.
2. The interface looks great thanks to its irregular hand-drawn interface, which looks like an art.
3. 100% clean and safe without ads, bundled software, malware, spyware, bloatware or other             annoying things.
4. Support importing most common video formats - AVI, MPEG, WMV, 3GP, MKV, FLV, MOV and     MP4, and can save video as MP4, AVI, WMV and MOV files.
5. Can export video without any quality loss.

How to join videos with Gihosoft Free Video Joiner
Before you start to join your videos, this video joiner free has some tutorials for you in the staring interface, you should read it quickly to get a general idea of the operations, and follow these steps below.
Step 1: Import the video files: Click the ADD button to import the video file, or you can just drag and drop the video to open it.


Step 2: Rearrange the order of the video. When you import the videos, they are placed in the box below the screen. To adjust them, you should hold the left mouse button, and move the videos to your ideal position. You can also feel free to delete any video if you don’t like it.

Step 3: Preview the videos. When you choose the videos you want to join, you can preview to see if the whole video meets your needs, you can change it any time if you are not satisfied with it.
Step 4:Save the video. Click the Save button, a new interface will pop up prompting you to choose the destination and format of your exporting video file. When set done, hit on the OK button and you will finally finish your job.
You see, Gihosoft Free Video Joiner is very simple to use, simple as it is, you can utilize it to join videos smoothly. Just have a try and you will know it’s the best free video joiner you’ve ever seen.

Thursday, February 9, 2017

Top 5 Best Free Video Cutter/Splitter for Windows 10 in 2017

As the development of Internet, difficult things used to be is becoming easier and easier. For example, in the past, when you want to cut a video, you many consider some professional video tools, such as Adobe Premiere and Sony Vegas. But now, you can easily get a simple and intuitive video cutter to cut what you don’t like in a few minutes without any technical skills. So here in this post, I’m going to share five best free video cutter for you to cut videos in an easy way.

1. Gihosoft Free Video Cutter
In my opinion, Gihosoft Free Video Cutter is the most beautiful products among all the video cutter software. When you install and open this software, you will be captivated by its irregular hand-drawing interface, which you never see before. Beautiful as it is, it also can cut videos professionally. All the operations are listed in the initial interface, everyone can understand it in a few minutes. You just need to drag and drop the videos onto the software, mark the starting point and ending point, and choose the format and saving location, then all is done, quite simple. Besides, you can use it to cut your favorite videos losslessly.


2. Cute Video Cutter
Cute Video Cutter also acts as a free yet easy-to-use video cutter like Gihosoft Free Video Cutter. User can utilize its full features to cut and split video clips into small size, so you can remove the unwanted parts as you wish. Simple it may be, it works well when cutting a video. It has many preset output video sizes, output video formats and output video quality for you to choose. Cute Video Cutter also supports lossless compression and retain the best video quality. You can easily operate it by using the slider, all clips will be shown in the interface for you to browse, no need any professional IT skills, no need any knowledge about all kinds of video formats.


3. Media Cope
Media Cope is a multi-functional media software for Windows, and it also contains the function of audio and video cutter. It can cut almost any video format as its official says. To cut a video by using Media Cope, first you should open a video file, then you can play the video to find the position where you want to start cutting and end your cutting. When you choose your ideal cutting portion, just click “Select Start” and “Select End” to finish it. If you want, you can preview the cutting portion by clicking “Play Selected”. Now it’s your turn to choose your format to keep the video, when you set it, just click “Save”, then your job is done, you just wait until it’s finished.


4. Kate's Video Cutter
Like other video cutter software, Kate's Video Cutter acts the same role as a program that you can use to cut clips and convert videos in various formats. The user interface is simple and straightforward, so you should not have any problems getting around it, no matter what level of experience you have. It supports many famous formats like AVI, WMV, MOV and MP4 etc. Users can use it to cut and save a region from any video clips at a certain scene. So that you can leave the scenes you need and get rid of the ones you don’t like.


5. Free Video Cutter Expert
Free Video Cutter Expert is a powerful, multilingual and versatile video cutter that users can utilize its full features to cut videos into one or more parts. It is completely free, and with it you can remove undesired parts such as trailer or black contents from video. It supports almost all popular video formats such as MP4, WMV, FLV, AVI, MPEG,MOV, MKV and so on. The operation is quite easy, first you need to drag and drop your video clip to the menu, and set “Clip Start” and “Clip End”. When you are setting the time, you can also adjust the time by hand tweaking the button time by time.


Related article: Free Video Cutter Online – 5 Best Sites for You to Cut Videos Online

Friday, January 13, 2017

How to Cut a Video Easily with VLC Media Player

When it comes to cut a video, you may consider a video cutter software, like Gihosoft Free Video Cutter, but if I tell you that you can use VLC media player to do so, you may feel strange. Yes, the first sight of VLC media player to most people is a video player. In fact, we do not use VLC media player to cut videos, instead, we record the portion of the video we want to cut to finish the process. Here I will tell you how to do it with 4 easy steps.

Step 1: Open VLC media player, click the View in the tool menu, and tick Advanced Controls to activate it.


Step 2: Once you activate the Advanced Controls, a toolbar with four buttons will appear above the Play/Pause button. The red dot button is the key to point, it’s used to record video, you need to use it in the next step.


Step 3: Play the video you want to cut, go to the starting position you want to cut. To cut the video accurately, you should press both play and Record button simultaneously, or you can play the video ahead of time, when the slider goes to the exact starting time, you press the Record button.


Step 4: When the video goes to the ending point you want to cut, you should stop it by pressing the Record button again. The clip will be automatically saved as an MP4 video file type, you can find it in your Libraries/Videos folder. 


So, these are all the steps to cut a video using VLC media player. It’s very easy if you follow these steps.

Monday, January 2, 2017

How To Edit Videos with Camtasia

When you use Camtasia to record videos, usually there are some unwanted parts in it, such as some irrelevant operations, or some glitches of your software which may cost your extra time, you may want to get rid of these. In this situation, you can just use some simple software, like Gihosoft Free Video Cutter to deal with them, or you can directly use Camtasia itself to do them. In this article, I will tell you how to edit videos with Camtasia, you can use it to split videos, add captions, callouts and transitions in it etc.

1. Import Video File
Open Camtasia and press the “Import media” button, load the video to the software, the video will show in the blank.


2. Edit Dimensions
After you import you video, pull it directly to the timeline, a new interface will pop up, the software will automatically ask you to edit dimensions. Choose and dimension you want to keep your video, you can select wide screen for 16:9 and standard for 4:3. If you are not sure about the aspect ratio, you can set it any time you like, or change the resolution as you wish. When adjusting the aspect ratio, you’d better keep the original rate, otherwise it will be stretched or squished, which is not comfortable for watching.


3. Trim the Video
You can comfortably play the video in the preview screen before you decide which parts you want to discard, the slider in the timeline will slide alongside with the video. To accurately control the time, you can use the UDLR key to adjust the time inch by inch.
To cut the unwanted part, you need to mark a start point and end point. When you choose the part you want to cut, just click the “Split” and a line will automatically appear. You just do it like this to mark the start point and end point, and click the right key of your mouse, choose “Remove from timeline”, you will finally cut the unwanted part successfully. 


If you want to do more operations with your video, it has different choices for you: you can use Callouts to add annotations, use Zoom-n-Pan to to zoom in the important parts, use Transitions to add special transitional effects, use Cursor Effects to display the cursor in different ways to underline the important parts, use Captions to add captions in the video.

Sunday, December 11, 2016

Hidden Things You Don’t Know About VLC Media Player

VLC media player is a frequently-used software in PC, it’s a product developed by Swiss Army Knife, many users only use a tiny fraction of its functions like watching videos and listening to music. However, it has many powerful functions all hidden in the toolbar, you will not know it until you dig into it. In this article, I will take you to walk through these functions listed below.

1. Add effects about audio and video
When you want to edit videos with some effects to make it looks more amazing, you may consider a professional video editor, but VLC is in there and you just ignore it. To use it, firstly you click Tools > Effects and Filters > Audio Effects/Video Effects, then you will come to the option interface.

When you choose video effects, VLC provides you to adjust the essential of hue, brightness, contrast, saturation and gamma. It’s also your choice to crop the video, adjust the color, add watermark or something else. When you choose audio effects, you can equalizer, compressor and spatializer, you just check the “Enable” and adjust the parameter.


2.Record desktop
Sometimes you may use Camtasia to record a screen video, but with VLC media player, you don’t need to install it, for VLC media player has a built-in recorder in it, and it’s very powerful. First go to Media > Convert/Save > Capture Devices, next you must set “Capture Mode” as “Desktop”, and tweak the value of “Desired frame rate for the capture” as 10, then click “Convert/Save”, a new interface will pop up. In this interface, you can set the resolution of the recording video in the “Profile” option, and set the saving location of your recording video. When all is doen, just click “Start”, and it starts to record, in the meanwhile, you can click the “Stop” button to stop recording.


3.Play and download online videos
To download YouTube videos, you can either use Gihosoft TubeGet,a free YouTube downloader, or you can just use VLC media player, which provides you an opportunity to download online videos, with this function you will save your time of downloading a video downloader and don’t waste your extra computer space.

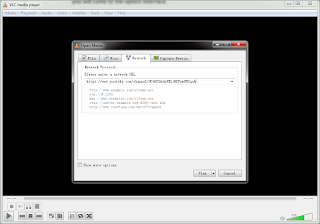
To operate this function, just click Media > Open Network Stream, and the paste the URL of video you copy from online sites. If you want to play it, you must choose “Play”, if you want to download it, you’d better click “Convert”.


4. Convert multimedia file
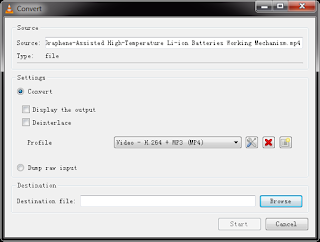
If you are still confused about different video editors in web as there are so many choices, VLC media player can be a best alternative. First click Media > Convert/Save, then add the file you want to convert, press the button of “Convert/Save”, you will see a new interface. In this interface, you can set the resolution you want to convert and the location to keep the video.


VLC media player also has many other powerful functions, these 4 functions listed up are the most common-used, I am sure they will help you a lot, and you don’t need to waste your time and extra space to install other related software.

Sunday, November 27, 2016

How to Save a YouTube Video and Cut the Undesired Parts

YouTube has been a favorite website watching videos for many people, as we can our my football team play with other teams, watch the latest TV series, view the state affairs happening over the world, it greatly broadens our horizons as a streaming transmission channel. There are many other advantages about YouTube, except that you can save a video from YouTube to computer, which will fret you when you see some interesting things and want to save it to watch it offline at times. So the question comes, how to download videos from YouTube? For that, you can try a YouTube downloader. When you finished downloading videos from YouTube, sometimes the video may not satisfy your needs because there are some unwanted parts in it, such as the trailor and some irrelevant information, so you also need a video cutter. Here comes the point, in this article I will tell you how to save a YouTube video and how to cut the unwanted parts.

Part 1: Download a Video From YouTube
Download and install two applications, Gihosoft TubeGet for downloading YouTube videos, Gihosoft free video cutter for cutting videos. Since there are many freewares in Google and many of them are capable of dealing with this problem, so you don’t need to cost your money to looking for the professional application.

When finishing downloading, copy the link of the video in YouTube, then paste the URL link to the corresponding capsule, usually a new interface will pop up indicating you to choose video resolution, video size, and the video format. Don’t hesitate to set the parameter of the video suitable for you, don’t forget to choose the saving location in the last. By the way, if you want to only download the audio of the video, directly click the button “YouTube to MP3”. When all set is done, the downloading is starting, you just sit tight until it’s finished.


Part 2: Cut the unwanted part and save it as you wish
Open the Gihosoft free video cutter after downloading the video, import the video into the application, you can also drag and drop the video directly into the screen, most free video cutters have this function. Watch the video again through the software for the sake of knowing the content well, then decide which parts you want to get rid of, after that, you can go to the next step.

Pull the slider in the timeline near the time you want to cut, then tweak the spin button to control the time second by second precisely. After you set the start time and end time, you’d better preview the video to see if it exactly covers your needs, some softwares may not contain the function of preview, you should keep in mind that.

The next step is setting the video resolution and location. Most video cutters support MP4, MKV, AVI, FLV as well as other popular video formats, if you know a little about this, you just choose MP4 for it’s the most common used format. Besides, you should choose the location to save the video, before make a decision, it’s wise of you to check out your computer space. When all is finished, save the video, and enjoy your masterpiece.


Note: Since everything has pros and cons, you should get a quick overview of the software before you choose the best free video cutter suitable for you.