Thursday, March 9, 2017

How to Cut and Join Videos with Avidemux

Avidemux is a free open-source video editing software, it’s designed for video cutting, video joining, video filtering and encoding. Free as it is, it supports many video formats, including MP4, AVI, MKV, MOV, ASF, FLV etc. Besides, all the features are intuitive and brief, so it’s very easy to use, even if you are a newbie. Another good news about Avidemux is that it has both Windows version and Mac version, so you can feel free to use it not worrying your computer operation system.

Although Avidemux is an all-in-one video tool, it’s often used as a video cutter and video joiner. So in this post, I will expound to you how to use Avidemux to cut and join videos, just read it and you will know the answer.

How to Use Avidemux to Cut Videos
1. Add a Video File
Just click File > Open, and you can be free to add the video you want to cut.
2. Set Start Marker and end Marker
Pull the slider on the time line, and click the A in the box if it’s your starting point. And pull the slider again until you find your ending point, then click B.
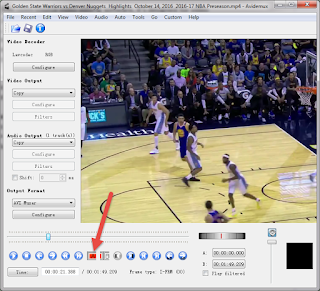


3. Cut the Part You Choose
When you choose the portion you want to cut, just click Edit > Cut, and the software will cut the parts very quickly. At that time, you should preview the video. If you are very satisfying with the video, then you should go to the next step, if you are not, just do the cutting process again.


4. Save the Video
After you get rid of the unwanted parts of the video, it’s your turn to set your output format. When all set is done, now hit on File > Save, and the video will be saved as a new video at a fast speed.

How to Use Avidemux to Join Videos
1. Add the First Video File
Click File > Open, and you can be free to add the video you want to cut. When you are importing a video, you have to know that Avidemux can’t change the arrangement of the joining video, so you have to add videos in chronological order.
2. Add the Rest of Videos in Order
When you want to add other videos, click File > Append. You must keep in mind that the rest of the videos must have the exactly same size as the first one, otherwise you can’t upload it successfully.
3. Set the Right Format
After you importing all the videos you want to join in order, now you have to select your ideal format for output. It has many choices for you, MKV muxer, AVI muxer, FLV muxer etc. Just picks up the one suits for you the best.
4. Save the Video
After all is done, just click File > Save, and the videos will be joined to a whole one.

Now you see, it’s very easy to use Avidemux to join and cut videos. Just give it a try and start the journey of homemade videos.


Thursday, March 2, 2017

Gihosoft Free Video Joiner - How to Join Videos in a Simple Way

We always want to take videos which impress us the most so that we can keep the precious moment forever! As the development of technology, we can take videos easily with our smartphones conveniently nowadays. Usually there are two problems with these videos. The first one is that these videos maybe have some unwanted parts, like blank or redundant content, for this problem, you can use Gihosoft Free Video Cutter to cut it. The other one is that you may feel inconvenient to watch several videos one by one, definitely a waste of time. It’s a better a idea to join these videos together to a whole video, for this purpose, Gihosoft Free Video Joiner can help you. Here I will give you some detailed descriptions about this video joiner software.

Why choose Gihosoft Free Video Joiner to join videos?
1. It’s completely free and easy-to-use, anyone can feel free to use any feature of this product without costing a penny.
2. The interface looks great thanks to its irregular hand-drawn interface, which looks like an art.
3. 100% clean and safe without ads, bundled software, malware, spyware, bloatware or other             annoying things.
4. Support importing most common video formats - AVI, MPEG, WMV, 3GP, MKV, FLV, MOV and     MP4, and can save video as MP4, AVI, WMV and MOV files.
5. Can export video without any quality loss.

How to join videos with Gihosoft Free Video Joiner
Before you start to join your videos, this video joiner free has some tutorials for you in the staring interface, you should read it quickly to get a general idea of the operations, and follow these steps below.
Step 1: Import the video files: Click the ADD button to import the video file, or you can just drag and drop the video to open it.


Step 2: Rearrange the order of the video. When you import the videos, they are placed in the box below the screen. To adjust them, you should hold the left mouse button, and move the videos to your ideal position. You can also feel free to delete any video if you don’t like it.

Step 3: Preview the videos. When you choose the videos you want to join, you can preview to see if the whole video meets your needs, you can change it any time if you are not satisfied with it.
Step 4:Save the video. Click the Save button, a new interface will pop up prompting you to choose the destination and format of your exporting video file. When set done, hit on the OK button and you will finally finish your job.
You see, Gihosoft Free Video Joiner is very simple to use, simple as it is, you can utilize it to join videos smoothly. Just have a try and you will know it’s the best free video joiner you’ve ever seen.